|
» Linksys WRT54G Revival!
|
#include <stddisclaimer.h>
When might you use this tip?
- If you forgot to set your "boot_wait" nvram setting and uploaded a
bad firmware image which caused your router not to boot (like I did)
- You failed every other instruction for reviving your router
- You like living on the edge and just wanna play
Pros: Turn your black and blue paper weight back into a working wireless router.
Cons: I suppose you could make your
WRT54G even deader than it already is, although I have not actually
heard of anyone who has done this. The pictures in this tip are for
people who have the v1.1 hardware. It works for the 1.0 and 2.0
versions as well but the board layout is a little different in the
other hardware versions. You'll just have to find your flash chip.
Tools Required: Small jewelers screwdriver (or any other small pointy metal object).
Ok, I'm convinced, let's get this baby working!!
Let us begin:
NOTE: Click on the thumbnail images in this tip to zoom in on the image.
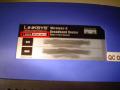
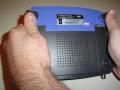
Find a nice open area to rip this baby apart:
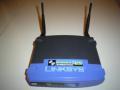
As you can see, the one I use in my example is a v1.1 router, your board layout may be different:
Use your fingers to unscrew the antennas from the back:
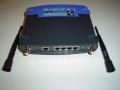
This thing just snaps together, no screws involved, so just
"pop" the blue face plate off. I find the easiest way to do this is to
turn the unit upside down and place your hands between the feet on the
side, then push on the blue feet with your thumbs:
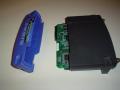
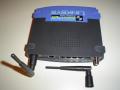
Now the board just slips right out the black cover:
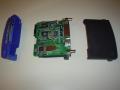
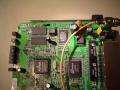
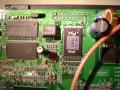
Now locate the flash chip.
On my board it is clearly labeled "Intel Flash" but I don't believe all
routers are labeled like this. Click on the pictures below for a better
view. You will see that at each corner of the chip is a large white
number. My picture is actually upside down (you didn't think I would
make this easy on you did you?). Notice at the upper right corner of
the chip is the number "1", upper left is the number "24", lower left
is the number "25", lower right is the number "48" (all upside down in
my pictures). Between the number 1 and 24 you will see a row of 24
silver pins. On the board above the pins there is a little white line
every 5 pins that should help you count.
Now comes the fun part. Do not plug the power in just yet but
plug a patch cable into one of the 4 LAN ports on your router and plug
the other end into a computer (my laptop works great for this).
Configure your network card on your computer with a static IP address:
IP: 192.168.1.2, NETMASK: 255.255.255.0, don't need a gateway address.
Now if you are in Linux just type "ping 192.168.1.1" which will start a ping running. If you are in Windows (shame on you) then I think you have to pass a "-t" param (ping -t 192.168.1.1) so it doesn't stop trying to ping after 4 pings.
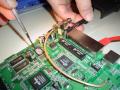
Ok, now for the nitty gritty fun part. Locate pin 15 (third white mark
starting from pin 1). Take your jewelers screwdriver (philips head is
what I used, nice and pointy) and touch the point between pins 15 and
16 (see NOTE1).
While holding the screwdriver there, plug in the power and watch your
ping screen. Hopefully you will be amazed (like I was) at seeing the
pings starting to succeed. Don't be so happy that you drop the
screwdriver on the board and start sparks flying. Remove the
screwdriver and the pings should continue:
The router is now in failsafe mode and is waiting on you to
tftp a firmware image to it. Find any good firmware image for your
router and upload it. In linux it might go something like this:
$ cd /home/voidmain/firmware
$ ls
OpenWrt_b3.bin
$ tftp 192.168.1.1
tftp> bin
tftp> put OpenWrt_b3.bin
|
If you have a command line version of tftp for Windows it should go
pretty much the same way. Just make sure you transfer the file in
binary mode (that's what the "bin" command did). Once the firmware has
uploaded, your router should automatically reboot. If you uploaded the
OpenWRT firmware like I did above you can then telnet into your box (telnet 192.168.1.1). If you uploaded the stock Linksys firmware you should be able to get to your router with your web browser (http://192.168.1.1/).
Now put your router back together by reversing the instructions in this
tip. You are triumphant and there will be much rejoicing.
NOTE1: In my guestbook "Westy" said he had to short pins 16-17 rather than 15-16 on his WRT54G-FR but the rest of this document worked.
Further Reading:
Linksys GPL Firmware page (Thank you Linksys and thank you Richard Stallman (GPL)!!)
Original instructions at OpenWRT forums
OpenWRT Web Site (my wireless web server runs it)
My revival thread (Thanks Jim!)
My wireless web server thread
Jim Buzbee's Linux on WRT54G page
Seattle Wireless WRT54G page
French Version of This (Thanks m.! Forum Topic)
P.S. SVEASOFT and Windows are not supported here.
Have fun!
Forums
|
|
|


